Distributions indicate the branches that should receive copies of a serial. Distributions work together with streams to indicate the number of copies that should be sent to each branch.
-
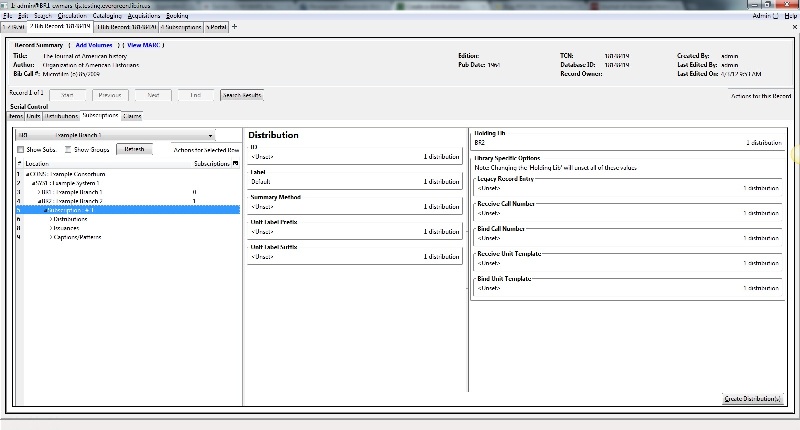
Click the distributions link beneath the subscription. Right click or click Actions for Selected Rows, and click Add distribution.
-
Apply a new label to the distribution. It may be useful to identify the branch to which you are distributing these issues in this field. This field is not publicly visible and only appears when an item is received. There are no limits on the number of characters that can be entered in this field.
-
Apply a prefix to the spine label if desired. This information will display in Serial Control View when the items are received, but it does not print on the spine label in . 0.
-
Apply a suffix to the spine label if desired. This information will display in Serial Control View when the items are received, but it does not print on the spine label in . 0.
-
The holding library is filled in by default and is the library to which you attached the subscription.
-
The Legacy Record Entry contains the MFHD records that are attached to the bib record if the owning library is identical to the distribution’s holding library. A distribution can thus be an extension of an MFHD record. Select the MFHD record from the drop down menu.
-
The Receive Call Number field is empty until you receive the first item. When you receive the first item, you are prompted to enter a call number. That call number will populate this drop down menu.
-
The Bind Call Number field is empty until you bind the first item. When you receive the first item, you are prompted to enter a call number. That call number will populate this drop down menu.
-
Receive Unit Template - The template that should be applied to copies when they are received. Select a template from the drop down menu.
-
Bind Unit Template - The template that should be applied to copies when they are bound. Select a template from the drop down menu.
-
When finished, click Create Distribution(s) in the bottom right corner of the screen.
-
A confirmation message appears. Click OK.
Note
You can add notes to the distribution by clicking Distribution Notes. These notes are currently viewable only in the staff client by clicking on the Distribution Notes button.