| HomePrev | Chapter 6. Cataloging | Next |
|---|---|---|
The cataloging module in Evergreen version 2.1 now includes a unified volume/copy creator that enables a user to create volumes and copies in a unified screen. This function consolidates the process of creating volume and copy records.
Administrative Settings
By default, the cataloging interface that existed in 2.0 will display in 2.1. To use the Unified Volume/Copy Creator, you must turn it on in the Admin module. You must log out of Evergreen and log back in for the changes to take effect.
To turn on the Unified Volume/Copy Creator:
After you turn on the Unified Volume/Copy Creator, it will display, by default, in a vertical panel. You may display the Unified Volume/Copy Creator in a horizontal panel. You must log out of Evergreen and log back in for the changes to take effect.
To choose the horizontal display of the Unified Volume/Copy Creator:
Add volumes and items using the Unified Volume/Copy Creator
The Unified Volume/Copy Creator enables you to edit call numbers and copy information in separate panes on a single, unified screen.
The Unified Volume/Copy Creator appears when you access the following links:
Record Summary → Add Volumes.
The ability to Add Volumes from the Record Summary is also a new functionality in 2.1.
In the following example, you will use the Unified Volume/Copy Creator to add multiple volumes and copies to bibliographic record from the Holdings Maintenance screen:

Right click, and click Add Volumes.

A Classification and a Call Number appear for each volume.
The Classification is derived from following setting in the Admin module: Admin → Local Administration → Library Settings Editor → Cataloging: Default Classification Scheme. The Call Number is derived from the MARC record.

You can add volume and copy information to each row individually or in batch. In the dark gray row, select a classification, prefix, call number, and suffix (if needed) from the drop down menus and apply those settings in batch to all of the volumes that you created. Click Apply.
The prefix and suffix drop down menus are populated by entries in the Admin menu. See Call Number Prefixes and Suffixes.

Enter the number of copies and barcodes that you want to add. The barcodes that you enter will populate in the Copy Editor.

If desired, select a copy template from the template drop down menu, and click Apply. Changes to copies appear in green.

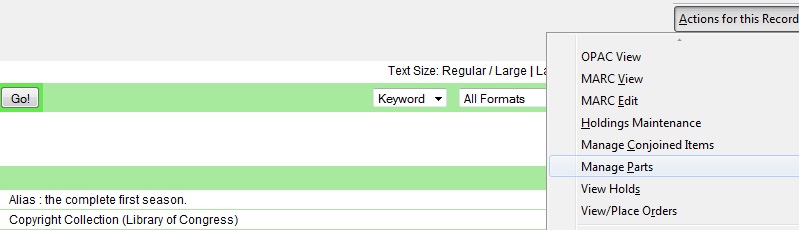
Monograph Parts enables you to differentiate between parts of monographs or other multi-part items. This feature enables catalogers to describe items more precisely by labeling the parts of an item. For example, catalogers might identify the parts of a monograph or the discs of a DVD set. This feature also allows patrons more flexibility when placing holds on multi-part items. A patron could place a hold on a specific disc of a DVD set if they want to access a specific season or episode rather than an entire series.
No new permissions or administrative settings are needed to use this feature.
To add a monograph part to an existing record in the catalog:
Click Actions for this Record → Manage Parts
Enter the label that you want to appear to the user in the catalog, and click Save.
This will create a list of monograph parts from which you can choose when you create a volume and copy.

Add a volume and copy. To add a volume and copy to your workstation library, click the Add Volumes link in the Record Summary at the top of the bibliographic record, or click Actions for this Record → Add Volumes.
To add a volume and copy to your workstation library or other libraries, click Actions for this Record → Holdings Maintenance → Add Volumes.

Apply a template to the copies, or edit fields in the Copy Editor.

The Holdings Maintenance screen will refresh to demonstrate the addition of the volume, copy, and part. These fields also appear in the OPAC View.

Prior to Evergreen version 2.1, items could be attached to only one bibliographic record. The Conjoined Items feature in Evergreen 2.1 enables catalogers to link items to multiple bibliographic records. This feature will enable more precise cataloging. For example, catalogers will be able to indicate items that are printed back to back, are bilingual, are part of a bound volume, are part of a set, or are available as an e-reader pre-load. This feature will also help the user retrieve more relevant search results. For example, a librarian catalogs a multi-volume festschrift. She can create a bibliographic record for the festschrift and a record for each volume. She can link the items on each volume to the festschrift record so that a patron could search for a volume or the festschrift and retrieve information about both works. In the example below, a librarian has created a bibliographic record for two bestselling items. These books are available as physical copies in the library, and they are available as e-reader downloads. The librarian will link the copy of the Kindle to the bibliographic records that are available on the e-reader.
The Conjoined Items feature was designed so that you can link items between bibliographic records when you have the item in hand, or when the item is not physically present. Both processes are described here. The steps are fewer if you have the item in hand, but both processes accomplish the same task. This documentalso demonstrates the process to edit or delete links between items and bibliographic records. Finally, the permission a cataloger needs to use this feature is listed.
Scenario 1: I want to link an item to another bibliographic record, but I do not have the item in hand. 1) Retrieve the bibliographic record to which you would like to link an item.
Click Actions for this Record → Mark as Target for Conjoined Items.

Select the copy that you want to link to the other bibliographic record. Right-click, or click Actions for Selected Rows → Link as Conjoined Items to Previously Marked Bib Record.

The Manage Conjoined Items interface opens in a new tab. This interface enables you to confirm the success of the link, and to change the peer type if desired. The Result column indicates that you created a successful link between the item and the bib record.

The default peer type, Back-to-back, was set as the peer type for our item. To change a peer type after the link has been created, right-click or click Actions for Selected Items → Change Peer Type. A drop down menu will appear. Select the desired peer type, and click OK.

The Result column will indicate that the Peer Type [has been] Updated.

To confirm the link between the item and the desired bib record, reload the tab containing the bib record to which you linked the item. Click the link for Linked Titles.

To view the copy details, including the peer type, click Copy Details.

Items can be linked to multiple bibliographic records simultaneously. If you click the linked titles button in the copy details, then you will retrieve a list of bibliographic records to which this item is linked.

Scenario 2: I want to link an item to another bibliographic record, and I do have the item in hand. 1) Retrieve the bibliographic record to which you would like to add the item.
Click Actions for this Record → Manage Conjoined Items.

Click Link to Bib (Submit).

When the bibliographic record appears, click Reload. Linked Titles will show the linked title and item.
Scenario 3: I want to edit or break the link between a copy and a bibliographic record. 1) Retrieve the bibliographic record that has a copy linked to it.
Required permission: UPDATE_COPY - Link items to bibliographic records