 |  | ||
| HomePrev | Chapter 98. Circulating Items | Next | |
|---|---|---|---|
1) To mark items Lost, retrieve patron record and click Items Out.
2) Select the item. Click on Actions for Selected Items → Mark Lost (by Patron).

3) The lost item now displays in the *Other/Special Circulations section of the patron record, unless otherwise customized through the Items Out display setting available in the Library Settings Editor.

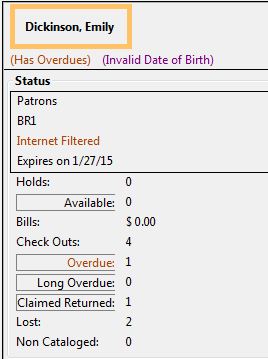
4) The lost item also adds to the count of Lost items in the patron summary on the left (or top) of the screen.

If an item is returned after a lost bill has been paid and the library’s policy is to void the replacement fee for lost-then-returned items, there will be a negative balance in the bill. A refund needs to be made to close the bill and the circulation record. Once the outstanding amount has been refunded, the bill and circulation record will be closed and the item will disappear from the Items Out screen.
Evergreen sites can prevent negative balances from occurring on fully-paid transactions with the Do not change fines/fees on zero-balance LOST transaction setting available through the Library Settings Editor. It will also prevent negative balances due to fully-paid, long overdue materials being returned. Negative balances will continue to occur when partially-paid lost items are reutnred.
If you need to balance a bill with a negative amount and close the linked lost circulation record without making a refund (removing the item from the Lost, Claimed Returned, Long Overdue, Has Unpaid Bills panel on the Items Out screen), you need to add a dummy bill to the existing bill equal to the absolute value of the negative amount. To do so:
1) Select the billing with the negative balance.
2) Choose Actions for Selected Transactions -→ Add Billing.
3) Click Yes.
4) Enter the absolute value of the negative balance.
1) To mark an item Claimed Returned, retrieve the patron record and go to the Items Out screen.
2) Select the item, then select Actions for Selected Items → Mark Claimed Returned from the dropdown menu.

3) Select a date and click Apply.

4) Any overdue fines associated with the transaction will now be based on the Claimed Returned date.
5) The Claimed Returned item now displays in the Other/Special Circulations section of the patron record, unless otherwise customized through the Items Out display setting available in the Library Settings Editor.

6) The Claimed Returned item adds to the count of Check Outs that are Claimed Returned in the patron summary on the left (or top) of the screen. It also adds to the total Claims-returned Count (including those that are current Check Outs and those that have since been returned) that is displayed when editing the patron’s record.

By default, the Items Out interface in the patron’s account is divided into two sections beneath the patron information: Items Out and Other/Special Circulations. In previous versions of Evergreen, all circulations appeared in the Items Out portion of the interface except for those marked LOST, LONGOVERDUE, or CLAIMSRETURNED, which appeared in the Other/Special Circulations portion of the interface.
This enhancement enables you to customize the placement of items in the LOST, LONGOVERDUE, or CLAIMSRETURNED statuses in the top or bottom list. The value of this enhancement includes increased control over and organization of the Items Out interface.
1) Three new org unit settings enable you to control the placement of these items. To access these settings, click Admin → Local Administration → Library Settings Editor, and search for the following settings:
The value for each setting is a numeric code describing the list in which the circulation should be placed when the item is checked out, and whether the circulation should appear in the bottom list when checked in, regardless of the state of the transaction. For example, an item may be checked in but the circulation may remain open because fees or fines are owed by the patron.
2) Enter the appropriate value, and click Update setting.
1 = Top list, then bottom list 2 = Bottom list, then bottom list 5 = Top list, then do not display 6 = Bottom list, then do not display
To Hide the bottom list entirely, set the value for all special statuses to "5".
Note that if all of the special statuses are hidden, then the interface more accurately represents a patron’s items out instead of a combination of items out and items with special circumstances. Alternatively, if all items out and items with special statuses display in the top list, then the bottom list is hidden, and more screen space exists to display a patron’s items out.